Categories
- Curriculum: Art | Art Criticism | Social Studies
- Age/Grade: Elementary 3 | Middle School | Above 14
- Subject: Multi-Media | Drawing | Collage | Sculpture | Exhibition | Photography
- Materials: Mixed Media | Pencils
- Institution: Friends Select School
- Location: Philadelphia, Pennsylvania
- Duration: 3 Classes
Description
A fun and informative introduction to the art of Keith Haring, and an opportunity for students to design and build their own paper figure sculptures and envision them anywhere they want!
Objective
Students will be introduced to the art of Keith Haring while watching a video interview with the artist and visiting the haringkids.com website.
Students and teacher will review and discuss Keith Haring's views of the function and placement of public art, and the importance of line and gesture in his figure drawings & paintings and scale in his sculptures.
Students will demonstrate their understanding of line and gesture as they design and create their own paper figure sculptures.
Students will demonstrate their understanding of scale as they work with the teacher to virtually "install" their sculpture in a location of their choosing.
Students will explain how gesture and scale influence the design of their sculptures during a class "gallery walk."
Resources
Drawing the Line: A Portrait of Keith Haring video
341A | Drawing the Line video | $20.00
-Call Pop Shop, 212.219.2784-
Materials
Any color index stock/heavy card paper (we used colored corrugated paper for this project)
Pencils
Colored pencils
Colored markers
Sketching paper
Pre-cut 4" x 4" cardboard squares
Scissors
Glue
Paper clips
Digital camera
Adobe Photoshop (I used 7.0 for this project)
Procedure
CLASS 1
A visit to the haringkids.com website is an engaging and fun way to start this lesson. I'm lucky enough to have a projector plugged into my computer, so as we gather on the rug of our artroom studio, the class checks out the site to learn about the artist and see his artworks on display around the world. Next, I show the portion of the Drawing the Line video where we see Keith talking about his public sculptures, his thoughts of the role of sculptures, how and where they are exhibited. This introduction and review takes between 10-15 minutes.
While still on the rug, I ask the students if anyone knows what gesture means (a movement of the body or limbs that expresses or emphasizes an idea or a feeling.) Review how Keith Haring uses gesture in his art with a look at some of his artworks (on display in the room). Next, I demonstrate gesture by picking an idea or feeling, strike a pose, and have the students guess what it is
charades! The students each choose a gesture, act it out, and hold the pose as I photograph them with the digital camera.
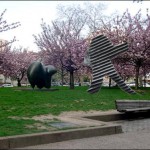
After photographing each of the students, I print out the photographs from the disc. As the photographs are printing, the students and I compile a list of locations in and around our school (Center City Philadelphia) that would make for great exhibition spaces. These can include spaces that already have other sculptures in that space, city plazas, gardens, etc. This is a great exercise in creating an awareness of where we already see sculpture in the world around us.
Before distributing the photographs of the students' gesture poses, I demonstrate how the photos are used as reference. Look at the photo and sketch a contour line gesture figure, based on the photo. Like a Keith Haring figure, it should be a simple outline, not detailed.
Distribute paper, pencils and photographs, and have the students create their figure sketches. Early finishers may take time to color them if they wish, but emphasize that these will be cut out from the paper in the next class.
CLASS 2
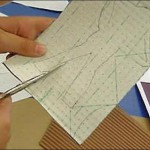
Review with a look at Keith Haring's gesture figure art. Students' sketched figures should be simple contour outlines, not very detailed, easy to cut. Teacher demonstrates how sketched figure is then cut from paper, placed on the index stock/heavy card paper, traced, and cut from that. Next, the finished cut-out figure is glued standing to the pre-cut 4" x 4" cardboard square, and clipped there if needed to dry. heavy card "hinges" , glued to the base, can be used to support the figure if needed (I usually have this done ahead of time with samples of each step, like a cooking show!)
Distribute supplies and student figure sketches. Students need to evaluate if their sketches will be easy or difficult to cut; some students may need to create simpler sketched figures.
Students cut out their sketches, place them on the index stock, trace and cut them out and glue to the cardboard base. Students who have finished these steps should write their name on the base and may decorate the base with markers, but the color figures should remain plain. When finished, students carry their artwork to drying area, clean up their space (checking under their table area for scraps; if usable, can be recycled), and then wash their hands. Assemble the sculptures and displays into a class exhibit and have students share their work, discussing how they use gesture in their figures, just as Keith Haring did. Have students try to guess what each others gestures are! If video equipment is available, record the students during this "gallery walk!"
Photographing the Sculptures
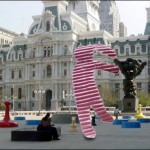
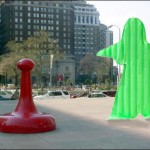
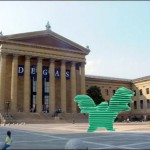
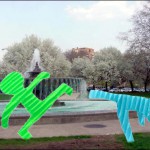
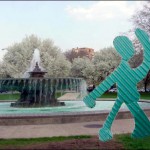
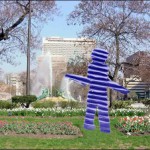
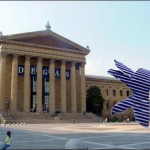
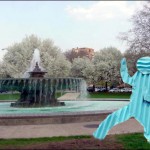
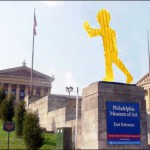
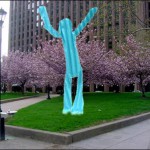
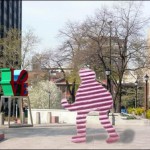
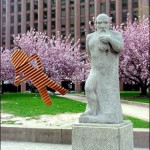
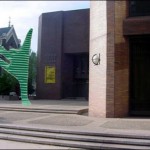
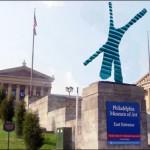
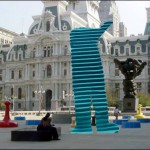
Between classes, I've visited and photographed the exhibit sites around the city taken from the list the students and I compiled earlier. Now that their own sculptures are complete, I photograph them with the digital camera, against a plain, dark background. I download the photos to Adobe Photoshop where I use the selection tool to separate the art from the background, and paste the sculpture onto the photographed exhibit site!
CLASS 3
I begin this class showing the students a sample of one of their sculptures set in a virtual installation in the city! We discuss the importance of placement and scale on their selected sites. Next, while the class is working on an extension activity, (A Keith Haring word search I created adds an Art History component!) I work with each student individually, using Adobe Photoshop to paste, move and re-size their sculptures against their exhibit backgrounds. When these are finished, I print the files and mount them for exhibit (This project was exhibited during our school-wide Spring Arts Festival). A class gallery walk and critique completes our project.
Questions
What do the terms gesture and scale mean?
How does Keith Haring use gesture in his art? What do his figures do?
How can you communicate feelings or actions in your art?
Where do you see sculptures?
What do you do when you see a sculpture? Do you just look at it? Should you touch it?
Can you play on or around it? Can you sit underneath or on top of it?
Should a sculpture be installed in a location by itself? Should it be placed with lots of other sculptures?
Where would you not install a sculpture?
Who do you think decides where a sculpture can and cannot go?
What did you learn about Keith Haring? Who does he make sculptures for?
Extensions
Early finishers can create companion sculptures; if there is more time left, you can always play another round of charades!
Friends Select's web site