Categories
- Curriculum: Art | Math
- Age/Grade: Elementary 1 | Elementary 2
- Subject: Multi-Media | Film | Printmaking
- Materials: Mixed Media | Crayons
- Institution: School of Visual Arts
- Location: New York, New York
- Duration: 2 Classes
Description
THIS LESSON USES THE NYC BLUEPRINT LEARNING STANDARDS.
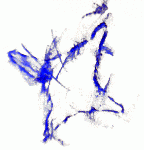
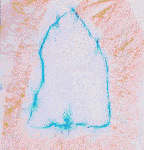
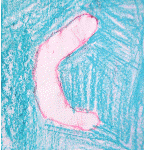
This flip book lesson is designed to make learning about animation a more tactile, fun experience for young learners by eliminating tracing and bringing the line to life. Students will use their hands to gradually bend and reshape a line (floral wire), while recording this experience using crayon rubbings. The sequential crayon rubbings will become frames for their flip book.
This lesson is originally designed to accompany a math lesson about closed shapes, giving students an experience with the formation of flat sides, curves, and angles.
Objective
Students will...
Learn the basics of flip book animation.
Learn that in animation each frame contains a tiny increment of change.
Learn that cartoons and movies are actually animations made up of several still frames.
Develop their understanding of the angles, curves, and sides that make up closed shapes.
Examine the sequence of changes necessary to change one shape into another.
Learn that they can create several prints of the same object using crayon rubbing.
Experiment with the order or rate of their frames.
Resources
Recommended Reading: "When a Line Bends... A Shape Begins" by Rhonda Gowler Greene
Haring web sites
Haring Exhibition catalogs
Materials
5" x 8" Index cards or paper of similar weight, 30 per child
Binder clips
Large crayons
Floral tape
Cloth Wire, cut in half and bent into circles
Thick white paper, 8.5" x 11" & 9" x 14", 1-2 sheets per child
Note:
This project works best with thin floral wire and heavy cardstock. Cloth covered floral wire and floral tape may be found at most craft stores or floral shops where silk flowers are sold. Cloth wire has a soft feel which is easier on the children's hands. Floral tape will smooth the ends of the wire circles without adding too much of a bulge.
Procedure
MOTIVATION
Discuss favorite cartoons and movies that are all animated, made up of several still frames. Show flip book exemplars.
VOCABULARY
Animation
Flip- Book
Frame
Increment
Gradual
Order
Reverse
Transform
Crayon Rubbing
Similar
Impression
Closed shapes: Circle, Square, Triangle, Trapezoid, Rectangle, Pentagon, Hexagon, Octagon, Semicircle, etc.
CLASS ONE
Setup
1. Experiment with the materials and create exemplars. Create one half -finished exemplar.
2. Find flip books to share and pass around.
3. Gather materials.
4. Cut each wire into half, and bend the halves into circles.
5. Secure each wire circle by twisting the edges and covering with a small patch of floral tape.
6. Divide your cards into stacks of 30 and clip each stack together with a small binder clip.
7. Peel the crayons.
8. On the board write "TIC, Tiny Increments of Change", and the steps as follows:
BEND, BEND, add a change
LINE UP shapes, almost the same
COVER UP with a new frame
RUB, RUB until you see the line
TAKE THE WIRE out from behind
8. Lay out the crayons, plain paper, and wire circles.
Introduction and discussion: (10 mins.)
1. Students will be seated in a circle.
2. Show exemplars of flip books which depict one shape changing into another.
3. Introduce TICs. tiny increments of change by introducing the word "increment", and listening to the sound that the pages of a flip book make as you flip them, There is only one little TIC on each frame.
Questions:
-What changes in the flip book?
-How many corners/ curves/ sides did the shape begin with?
-How many were there in the final shape?
4. Have the students count.
As they do so, show the wire, and change from one shape into another. Smooth sides, bend corners. Demonstrate crayon rubbing.
Transition: (5 minutes)
Ask students to stand up and try to change their circle into another shape. Each time the students make a step they can make a ticking sound.
Practice: (10 mins.)
1. Experimentation: Students will be seated at their tables with plain paper, crayons, and wire to practice manipulating the wire and making rubbings. Students may wish to hold up their wire if they have made a unique shape.
2. Planning: Ask the students to choose two shapes for their flip book, one beginning shape, and one end shape.
Tip:It is easier to start with whichever shape is more complex and smooth it into the simpler shape.By having students make a "tick" sound as they bend the wire they can remember to make very small changes.
Instruction: (10 minutes)
1. Review the steps on the board.
2. lay out materials, and one exemplar, spread out the frames.
3. Using the same two shapes go through the steps, having the students say them out loud.
4. Once the students are confident with predicting your next step show them the unfinished animation.
5. Students return to their tables to start their own flip books.
Work Time: (10 minutes)
1.Students will write their names on their flip books.
2. Each child may begin to make their first few frames.
Cleanup:
Have each child clip their practice sheets, index cards, and wire circle together. Crayons should be returned to boxes.
CLASS TWO
Setup:
1. Lay out the materials and the flip books at the tables.
2. Choose exemplars of unfinished flipbooks from students who have worked quickly.
Introduction and discussion: (5 minutes)
1. Take a look at a few of the flip books the students have started, and discuss briefly.
2. Review the steps out loud.
Questions:
-Who can tell me what the word increment means?
-Does anyone remember what T-I-C stands for?
-What shape do you think will be next in Brian's flipbook?
-What does Maria need to change next?
Work time (35 minutes)
1. As the class works on their project, check for students that are having trouble bending their wire. They may need to use thinner wire. If students are heavy handed remind them to make small changes.
2. Each student may create a cover for their flip book.Students who finish early may choose to color in their shapes using the side of the crayon
3. Even up the bottom edges of the flip book, and add a binder clip.
Tip: For easier flipping the teacher may add a slight bevel to the edges of the book by leaning the stack of cards at a slight angle on the table as they are evened up.- The wire loops of the binder clips can often be removed by squeezing them near the hinge, leaving a neat clip.
SUMMARY
In a group meeting, students will share and discuss their flip books.
Questions:
Which shapes were difficult?
Were there any surprise endings?
What happens if you flip the book in reverse?
If time is limited the teacher can flip each book for the class while the students discuss their work.
ADAPTIONS
Students who work quickly may choose to layer several shapes. In order to do this they should work on one shape at a time, cycling through the entire set of frames with each new addition. They may use different color crayon for each shape. These students may also choose to color in their shapes. It is best to color the shapes using the side of the crayon to save time.
Students who have greater fine motor control may choose to use a wire that is not closed into a circle. They may bend the wire beforehand and gradually move it across the page, or slowly transform the shape of the line.
Older students may choose to use other objects such as leaves, lace, cut sandpaper, tiny rubber hair-bands, and coins in their animation. Rather than experimenting with shape they can focus on placement in the frame, interaction, and storytelling.
The basic shapes created by these objects can be colored in or altered.Simple features or details such as eyes, wings, etc may be added frame by frame.
Tips: Add one new object at a time to the animation, cycling through every frame. This way each object can have its own color.
Additional Vocabulary:Metamorphosis. Sequential. Rate, FPS (Frames per second).
Extensions
BLUEPRINT LEARNING STANDARDS FOR THE ARTS
1. Art Making
Students will learn about animation through the creation of a flip book. They will build their understanding of shape and form as they experiment with bending. They will practice the basic printmaking technique of crayon rubbing
2. Literacy in the Arts
Students will learn new vocabulary words that relate to animation and form. The class will share their flipbooks discussing their process and the metamorphoses of their shape.
3. Making Cultural Connections through Visual Arts
Connections will be drawn between art and animated movies which are familiar to the students.
5. Careers and Lifelong Learning in Visual Arts
Students will discover the role of artists as animators.
NY STATE STANDARDS EMPLOYED
1. Creating, Performing and participating in the arts.
2. Knowing and Using Arts Resources and Materials.
3. Responding and Analyzing Works of Art.
The author of this lesson, Kellie Rilla, a Masters in Art Education student of the School of Visual Arts in NYC, is the 2004-2005 scholarship recipient of the Keith Haring Scholarship award. This project is a collaboration with The School of Visual Arts & a local NYC public elementary school.
To find out more about The Keith Haring Foundation Scholarship offered through the School of Visual Arts, please contact: Director, School of Visual Arts/Visual Arts Foundation, 15 Gramercy Park South, NYC 10003 or SVA's web site.