Categories
- Curriculum: Math | Social Studies | Dance & Music
- Age/Grade: Elementary 2 | Elementary 3
- Subject: Drawing | Collage
- Materials: Mixed Media | Pencils | Crayons
- Institution: East Elementary School
- Location: Roosevelt, Utah
- Duration: 1 Class
Description
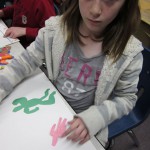
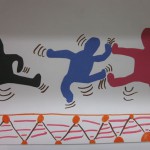
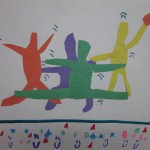
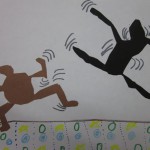
Our 2nd graders did a fabulous job as they created these amazing pictures in the style of Keith Haring. We learned how to draw basic body shapes in proportion by drawing ovals. We drew an oval for the head, a bigger oval for the body, 3 smaller ovals for each arm, and then 3 ovals for each leg. We learned that our body only bends where we have a joint... in this case where two of our ovals met. We drew people doing all kinds of fun things. Ideally, the children drew figures doing something that was important to them... something they loved. Then we cut out our figures and glued them down. We tried to overlap the figures to show depth. This was a hard concept for the children to understand, but it was really interesting to see the results. Finally, we created some visual texture by making a beautiful patterned floor for our figures to dance on. I love the energy in all of these pictures. In the 2nd picture especially, you can actually see the children playing basketball. The overlapping in this piece of artwork provides so much depth to the picture.
Objective
Social Studies: Self-awareness: I like being me. Each child will create artwork that shows self-awareness, ideally representing the child doing something that they love to do, either dancing or jumping or playing a game. Math: Shapes and Proportions. Each child will use ovals to draw a basic human figure using correct proportions. Art: Each child will complete artwork in the style of Keith Haring using the following criteria: 1. Make 2-5 figures in the style of Keith Haring (advanced children had time to make more figures). Each figure should be doing something you LOVE to do. Either dancing or jumping or playing a game. 2. Overlap two figures if possible. This makes your picture have more depth and makes it interesting to look at. 3. Draw a Horizontal line with markers and then decorate your floor using patterns and designs that we have studied in art class. 4. Draw motion lines around the figures to show the movement.
Resources
Art Prints of Keith Haring Pop Art showing the people dancing and moving.
Materials
White 12 x 18 Art Paper - 1 per child 6 x 9" construction paper in assorted colors -- about 5 per child Glue Sticks Scissors pencils Crayola Washable Markers in assorted colors Oval People made from tagboard with flexible brads for joints --- 1 for each child.
Procedure
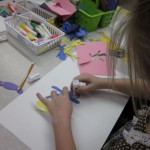
1. In our sketch book we practiced drawing people using basic oval shapes (5-10 minutes). If you don't have sketch books, just do this practice on a piece of paper. First we drew the head, then we drew an oval for the body about twice the length of the head. Then we drew three ovals for the arms and three longer ovals for the legs and feet. We moved our bodies to see that we could only bend our bodies where there is a joint, in this case, where the ovals meet. Then we came to the carpet and watched a slide show about Keith Haring. 2. During the slide show we talked about the art of Keith Haring (5-10 minutes) . We looked at some of his famous artwork. We saw that when he drew people he just drew the "contour" or outside edge and then filled the shape with color. We noticed that he liked to use bright colors and that his photos had lots of energy. We talked about the "motion" lines he put around some of his people to show energy and movement. We looked at the Horizontal line in one of his pictures and the textured floor. 3. Teacher Modeling (10 minutes): I model the entire process for the children before they begin. Work Fast! Using an OVAL person (made from tagboard) show the children how the joints move to make a figure do something fun. Adjust the oval person and then show the children how to "look THEN draw. We are not tracing oval person, but just looking at him and then drawing him on the 6 x 9" brightly colored construction paper. Have the children write their NAMES on the belly of their oval people as a reminder that the glue will go on top of their name. Model how to cut out the basic figure with smooth easy lines. As soon as you finished your first person, then draw another one doing something different. Model how to arrange 4 or 5 figures on the paper to create and interesting piece of art. I encourage the students to overlap at least one figure because this is an art concept I want them to understand. It is not authentic to Keith Haring in this case, but it is fun if the y figure out how to overlap figures to show depth. Show students how to put glue on the PENCIL side of the figures so when we glue them down we cannot see the pencil lines. Draw a horizontal line and then decorate the floor with pattern and design to add visual texture. As a final step, add the motion lines to the figures to show movement. 8. Work Session (30-40 minutes) : Students create 2-5 figures, then glue them down, and create their artwork. 9. As the students finish their artwork, I put each finished piece up on a board so the whole class could look at the finished artwork at the end of class when we have our discussion. We had fun seeing the different activities that the people were doing. 10. Assessment and Summary: Gather the children back on the carpet and look at the artwork. We play the "I see" game, by looking at the artwork and describing what we see. Review the criteria and have the children self-assess what they have done. We taught this lesson in a 1 hour time block. I helped the slower children cut out their figures so they had more time to "draw" them.
Questions
What kind of "mood" do you see in the Keith Haring Art we see? Why do you think Keith Haring used bright colors in this picture? How did he want people to "feel" when they looked at his artwork?
Extensions
Dance and Movement: Children can pretend that they are a figure in one of Keith Haring pictures.