Categories
- Curriculum: Art | Community Service | Social Studies | Dance & Music
- Age/Grade: Middle School | Above 14
- Subject: Drawing | Painting | Sculpture | Exhibition
- Materials: Paint | Markers
- Institution: Realschule Zell
- Location: Zell, Germany
- Duration:
Description
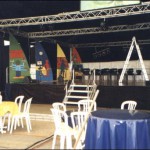
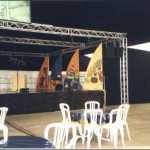
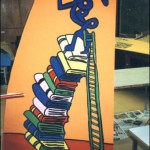
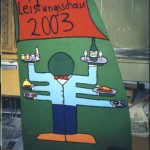
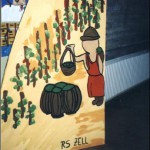
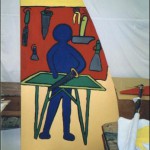
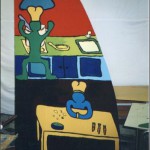
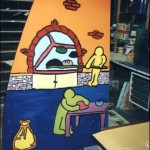
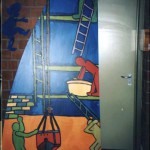
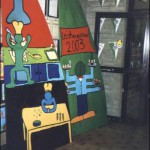
This 7th grade class designed a stage set for their local job convention. Using Haring's bold and colorful style, they created emblems of various different occupations on large, free standing wood boards that were placed around the stage.
Objective
To expose students to the life and work of Keith Haring.
To help children learn how to work collaboratively on a project that emphasized creative expression and teamwork.
To broaden students' understanding of various different occupations and how they might be depicted visually using symbols and simple, bold designs.
To allow children the opportunity to enhance a community activity by donating their time and efforts to something larger than their school.
To give students the opportunity to work in a large space, exploring ideas of scale, space, and presentation.
Materials
for the design
White pieces of paper
Pencils
Felt-tip markers
Transparencies for the overhead projector
for decorating the boards
Eight wood boards 5' x 8.2' (1.5m x 2.5m) (chip board works well)
Black permanent marker
Gesso or other paint primer (optional) Acrylic paint
Overhead projector
Transparencies
Transparent lacquer (polyeurothane or shellac)
Jig saw
Procedure
BACKGROUND INFORMATION
Every four years there is an exhibition in our area where companies, tradespeople, and banks have the possibility to show the public what they produce and sell or what they do. Even schools can take part in this event. For this reason, large tents were erected and in one of them our school established a cafe that was decorated with different pieces of art. We sold coffee and cake and a lot of visitors enjoyed it.
Furthermore, we got the order to design and decorate a big stage where different performances were held. For example, some orchestras played their music, dance groups danced and the Mayor and other very important people gave speeches. The town council gave us the necessary pieces of wood, boards, and planks, and the pupils sawed the suitable shape. The pupils had decided to decorate the boards using Keith Haring's style, and were very proud when the visitors of the exhibition admired their finished product.
STEP 1
First the students sawed the chipboards in the suitable form.
STEP 2
Then we found out the different types of exhibitors.
STEP 3
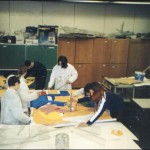
After that we collected ideas on how to decorate the boards.
STEP 4
Every student chose one type of exhibitor, for example: carpenter, backer, electrician, etc...
STEP 5
Each student drew a picture their assigned exhibitor on a piece of paper
STEP 6
The designs were voted on and eight were chosen to represent the class.
STEP 7
We copied the chosen pictures onto transparencies using a permanent felt-tip marker.
STEP 8
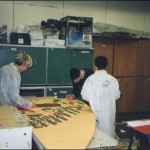
We projected the transparencies onto to large wooden boards.
STEP 9
We drew the outlines of the pictures with permanent black marker on to the boards.
STEP 10
We painted the background first with acrylic paint, then we painted the details.
STEP 11
We retraced every outline with a very thin brush using black paint.
STEP 12
After the paint had dried we covered the pictures with transparent lacquer.
STEP 13
The back sides of the boards were then painted black using acrylic paint.
STEP 14
After the boards were dry, they were fixed to the stage by some employees of the town council.
Questions
How does painting function in a public setting?
How does this form of display of art function differently than artwork hung in a museum?