Categories
- Curriculum: Art | Community Service | Social Studies
- Age/Grade: Elementary 3 | Middle School | Above 14
- Subject: Painting | Exhibition
- Materials: Pencils | Paint
- Institution: Realschule Zell
- Location: Zell, Germany
- Duration: 2 - 3 Classes
Description
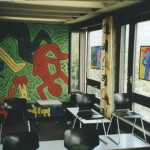
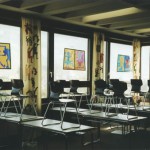
Make your classroom a bright and inspiring place for you and your students to work in. This project shows you how to paint a wall mural, wake up old curtains, and filter light through wonderful stained glass, a la Haring, of course. Great for school and for home.
Objective
To share Keith Haring's vision with children.
To help students understand how art can change a space.
To make the classroom a bright and exciting place for the students and teacher to work in.
Resources
It is a kind of tradition that the students decorate their classroom by drawing murals or pictures for the windows. The students of grade 6D decided to decorate their room in the style of Keith Haring.
Materials
MURAL
Paper
Pencils
Tinting paint (Acrylic paint)
Painting supplies
Black permanent marker
Wallpaper (optional)
Polyurethane or shellac (optional)
CURTAINS
Paper
Pencils
Paint for cloth (Acrylic paint will work, also try fabric markers)
Painting supplies
Old curtains
STAINED GLASS
Picture frames (we got ours at a local department store)
Perspex (plexy-glass or acetate you can get at an art or craft store. Acetate comes in a pad too)
Acrylic paint (an opaque paint for the outlines)
Liquid window paint (stained glass paint)
Procedure
MURAL
1. We put wallpaper onto the back of the classroom (optional).
2. The students drew a picture on a piece of paper.
3. We copied the picture onto a transparency.
4. We projected it with an overead projector onto the wall.
5. We drew the outlines of the picture with a black marker.
6. We coloured the background with tinting paint (acrylic paint).
7. We coloured the figures.
8. We retraced every outline witha very think paintbrush.
9. You may add a sealant like shellac or polyeurothane to protect the mural from damage.
CURTAINS
1. The students drew pictures on a piece of paper.
2. The pictures are retraced with a black felt-tip marker.
3. The traced designs are put under the cloth and the outlines are retraced witha pencil.
4. The figures are coloured with paint on the cloth.
5. The outlines are retraced with a very thin paintbrush.
STAINED GLASS
1. Frames are varnished.
2. Perspex (plexy-glass) is cut and put into the frames. (you may use unframed sheets of acetate for a much simpler procedure).
3. Designs are drawn on paper.
4. These drawings are put under the perspex (plexy-glass or acetate). We used lining paint to draw the outlines of the picture onto the perspex (Acrylic paint).
5. Use liquid window colour to paint inside the lines (use a stained glass paint that can be purchased at any crafts store. It is transparent and adheres to plastic).
Questions
How does art change a space?
Why does Haring's style work so well on a large scale?
What would you do different if you could do the project over?
What would you do more of?
What sort of ideas did this project give you for future artworks?
Extensions
Have an opening of the work, or "installation", and invite other classes for apple juice and cookies and discussions on the art- how it was made, what materials were used, how long it took, who worked on it, what the inspiration was...
If you are interested in using this lesson at school or any othe public institution, we recommend that you receive the approval of the appropriate authorities before beginning.