Categories
- Curriculum: Art | Science | Social Studies
- Age/Grade: Elementary 1 | Elementary 2 | Elementary 3
- Subject: Sculpture
- Materials: Mixed Media | Clay
- Institution: School of Visual Arts
- Location: New York, New York
- Duration: 2 Classes
Description
THIS LESSON USES THE NYC BLUEPRINT LEARNING STANDARDS.
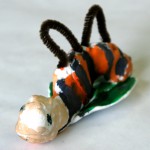
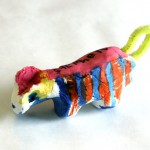
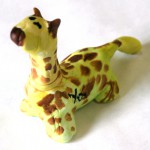
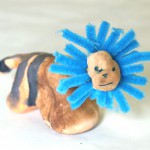
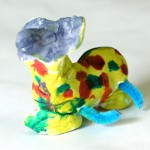
Elementary students design their own mix and matched animals, using a lesson framework that emphasizes transformation, then they experiment with clay and shape their animals into 3D sculptures.
This lesson accompanies the following additional lessons:
"Clay for Fun"
"Creating a Cranimal"
"Paper Sculpture Habitats"
Objective
The students will develop skills in sculpture.
The students will learn about the differences in clay and model magic.
The students will learn about push, pull, pinching and attaching to make animal forms out of model magic forms.
The students will gain experience translating their 2D ideas into 3D.
Students will exploring painting on a 3D surface.
Resources
Nature photographs of animals
Keith Haring's sculpture
Materials
Poster of Animal pictures with their names
Drawings that the students completed last week
Model Magic clay
Scissors
Clay tools
Craft supplies like pipe cleaners, markers
Paint and painting supplies (brushes, sponges, paper towels, water/cups)
Procedure
MOTIVATION
For the students to experience making representational yet imaginative animal forms in 3D with Model Magic.
VOCABULARY
translate, 2D, 3D, sculpture, model magic, push and pull (in terms of clay).
PROCEDURE
DAY 1
Students will gather on the carpet. We will talk about last week's lesson in clay, and the lesson before that making Cranimals.
Key Questions: Who can tell me what we did last week? What were some things that you did with the clay? Did you make anything? Can anyone remember what we did the week before? Does any one have any ideas on what we could do that would combine those two lessons?
Demonstration with model magic: Talk about the differences between model magic and clay. Ask students to think about their animals. What do you remember from working with the clay that could help you turn this piece of model magic into your Cranimal? Go over push and pull, pinching, rolling, etc. Show students how to attach two pieces of model magic together. Check for understanding. Talk about ways in which they can make their Cranimal stand up.
Students go to sit at desks: Each student's Cranimal drawing will have been placed at their seat. Talk about their drawings, and remind students that they are going to be turning their drawings into 3D forms. Ask students how they can use the model magic to turn their drawing into a 3D form (push, pull, attach, etc).
Show Exemplar: Who remembers the Cranimal drawing that I made? Would you want to see how I turned it into a 3D form?
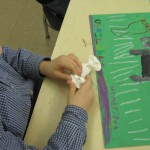
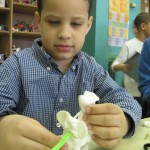
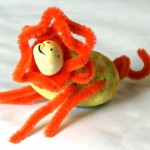
Students work: Hand out model magic. Tell students that model magic dries on its own, so they will only have this one class to work on their Cranimals. Tell students that we will get to add more detail by painting the Cranimal sculptures next class. At 5-10 minutes in, stop students and introduce pipe cleaners. Talk about how they can embellish their Cranimals with pipe cleaners.
Closure: Due to the nature of model magic, work will likely continue for all available time.
DAY 2
Students gather on the carpet for a review of animal colors and patterns.
Key Questions: So, what did we do last week? That's right, we made our Cranimals out of model magic. Can anyone tell me how we could make our model magic Cranimals look more the like animals we want to make? That's right - we can add color! How might we do that? We are going to use water color paint. Now, what kinds of colors do you see on the animals on the poster? What else do you see on the animals? What do some animals have that make them look like your shirt, maybe? That's right - a pattern. Which animals have a pattern, and what is it? OK Great. Now, who has ideas about how to paint your Cranimals?
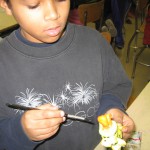
Students return to their desks: Students are shown images of Haring's sculpture, busts, etc. that have been drawn and painted on. Discussion about combining drawing and painting with sculpture. Quick review of using watercolor, and how to handle the fragile model magic Cranimals. Students will be allowed to add details in marker once they are finished with the watercolors. Students work for the remainder of the period, with frequent stops to gather and focus them on their work.
Extensions
Assessment: Students will be assessed during class time and by their work. Comprehension of ideas will also be checked for and noted. Assessment will strive to understand: How well the students understood and explored the idea of using push and pull etc. to create their Cranimal, and how they addressed their sculpture as a 3D object.
Enrichment & Reinforcement: The next lesson will consist of making a paper sculpture habitat for their Cranimals.
BLUEPRINT LEARNING STANDARDS FOR THE ARTS
1. Art Making: Students create sculptures based on their Cranimal drawings, imagination, memory, and observation of photographs.
2. Literacy in the Arts: Students' competency in sculpture vocabulary is reinforced and students discuss their artwork.
3. Making Connections: Students have to translate their ideas into a new medium.
NY STATE STANDARDS EMPLOYED
1. creating, performing, participating.
2. knowing and using materials.
3. responding and analyzing works of art
The author of this lesson, Marie Antonelli, a Masters in Art Education student of the School of Visual Arts in NYC, is the 2005-2006 scholarship recipient of the Keith Haring Scholarship award. This project is a collaboration with The School of Visual Arts & a local NYC public high school.
To find out more about The Keith Haring Foundation Scholarship offered through the School of Visual Arts, please contact: Director, School of Visual Arts/Visual Arts Foundation, 15 Gramercy Park South, NYC 10003 or SVA's web site.