Categories
- Curriculum: Art | Science
- Age/Grade: Elementary 1 | Elementary 2
- Subject: Multi-Media | Collage | Sculpture | Exhibition
- Materials: Mixed Media
- Institution: School of Visual Arts
- Location: New York, New York
- Duration: 2 Classes
Description
THIS LESSON USES THE NYC BLUEPRINT LEARNING STANDARDS.
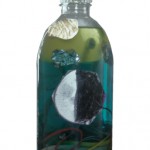
This lesson is designed to allow students to experiment with the roles of scientists and graphic designers. Students will design a magic potion. The lesson gives students a chance to practice math and science skills such as mixing and measuring while learning about color, and design.
Objective
Students will...
PART ONE
Learn about color relationships, opacity, and color mixing through experimentation.
Experiment with recycled materials to create a three dimensional arrangement.
Develop fine motor skills
Learn about experimentation, mixing and measurement
Work in pairs.
PART TWO
Learn how designers convey ideas through packaging.
Use critical thinking skills and imagination to invent a magic potion.
Practice using recycled materials, crayons, and glue.
Resources
Subway artwork by Keith Haring featuring magical creatures and transformations
Suggested reading: "Mouse Paint" by Ellen Stoll Walsh
Suggested listening: "The color song" by Hap Palmer
Haring web sites
Haring Exhibition catalogs
Materials
PART ONE
Large empty recyclable plastic bottles, 1 or 2 liter, 1 per child
Food Coloring
Water
Pitchers
Clear plastic cups
Foil large muffin tins or cardboard cupholders
Funnels
Color wheel
Towels and sponges
Shredded colored plastic grocery bags
Tinsel
Tin foil
Markers
Index Cards
Smocks
PART TWO
Typing paper, cut in half
Crayons and markers
Colored scrap paper
Recyclable materials (foil, small pieces of cardboard)
Extra touches (wiggle eyes, ribbon, etc.)
Procedure
MOTIVATION
Discuss what happens when colors mix and change. Invite students to discuss the word potion. Refresh knowledge of color wheel. Discuss the word hypothesis.
VOCABULARY
Experiment
Scientist
Mixture
Record
Formula
Hypothesis
Transparent
Reflective
Opaque
Dye
Liquid
Solid
Mixture
Recycle/recyclable
Primary and secondary colors
PART ONE
SETUP
You may wish to line tables with newspaper or have box lids or metal baking trays available to work in to avoid spills. If the weather is nice, try this project outside.
Take one index card per child and create 3 or 4 dots on the card using red, blue, and/or yellow marker. This will serve as a test formula for your students, you may limit the palette or repeat colors to get different results.
You may minimize spills by setting up the room so that all of the tables are lined up in "stations" against the wall. Stations on one side of the room will have water pitchers and equipment for pouring and mixing. Stations at the opposite side of the room will have scraps of colored grocery bags, strips of tin foil, bottles, and sharpie markers.For very young students, place a line of tape a few inches away from the edge of the table, or draw a line on the newspaper covering your table. This will help them to remember not to set cups too close to the edge.Setup: (20 mins)
Each student should have three cups, three index cards, markers, and a marker.
If you have foil muffin tins or cup-holders make sure that your cups fit.
Fill pitchers with water, add one inch of water to each cup.
Draw a line using permanent marker at the 2/3 level on the cup. This is the limit.
Tape bottlecaps to the sides of bottles, or, if they are all similar, collect them and have them ready in a box.
Introduction and discussion: (10 mins.)
1. Talk to students about scientists and how they conduct experiments.
2. Show them one test card, Guess what this combination of colors would make. (may introduce term "hypothesis")
3. Present the water and dye. Ask a buddy to hold the cup still while you pour.
4. Add one drop of food coloring based upon the first dot on the test card.
5. Ask the class to describe the color. Is it transparent or opaque? Show cut plastic grocery bags and foil. Compare.
6. Add more water, the next dot, and the final dot. Pause in between to ask questions.
7. Write down the final color on the card.
8. Pass out smocks.
9. Explain to students that their first card will have a formula on it for them to test. On their two blank cards they will record their own experiments. The limit is 4 drops.
9. Carefully explain safety rules. (no running, keep all supplies on the table, never drink the water)
10. Dismiss students to the stations in pairs.
Practice: (20 mins.)
1. Experimentation: Students will help their partner complete the experiment on their card.
2. All completed cups should be lined up at the stations
Review:
3. Students will return to the center of the room.
4. There will be a brief discussion of the results of the experiments.
5. The teacher will demonstrate the addition of strips of plastic and balled up tin foil to the bottle.
6. After adding these materials, teacher will choose two cups of colored water to add to the bottle.
7. A helper will hold the funnel while the teacher carefully pours each cup into their bottle.
Work Time: (15 minutes)
1.Students will write their names on their empty bottles
2. Each child may begin to add materials to their bottles at the dry stations.
3. While students are doing this, the teacher may wish to divide the colored water cups from the experimentation process into clusters based upon color, weeding out neutral or murky colors.
4. As students are ready they will have permission to return to the color mixing stations in pairs.
5. Students may add an extra drop of dye if needed.
6. Students may finish filling their bottles, and immediately close the bottles with a cap. This should be supervised closely, and caps should be tested for tightness.
Cleanup: (5-10 minutes)
1. Bottles will be collected.
2. Students may wipe down work-surfaces.
PART TWO
SETUP
1. Seal lids onto bottles tightly by placing a ridge of hot glue along the top edge of the bottle before closing the cap.
2. Cover caps with clear packing tape Before Class
3. Place each child's bottle at his or her table.
4. Place drawing materials at tables
Introduction and discussion: (10 mins.)
1. Talk about magic potions.
2. Show artwork of Keith Haring.
3. Show examples of labels containing illustration.
4. Talk about designing a label.
5. Return students to tables.
Thinking time (5 minutes)
1. As they look at their solutions the teacher will ask students to look carefully at the colors in their bottle, and close their eyes. Students will be given some time to think about what magical powers their solution could have.
2. The teacher will visit each table. Students who are ready with their ideas may begin drawing a label.*If students are old enough to write they may write their idea on a note card.
Work time (30 minutes)
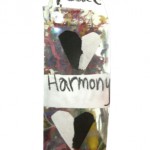
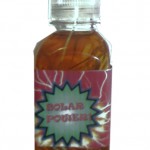
1. Students will design their labels on half sheets of white paper using crayon
2. Glue and collage supplies will be brought to the tables
3. Students will glue labels onto their bottles and begin to add collage elements.
In a group meeting, students will share and discuss their potions. Students will have a group display of their work.
In Art or English class students may wish to write about their magic potions, or create instructions.
Extensions
BLUEPRINT LEARNING STANDARDS FOR THE ARTS
1. Art Making
Students will conduct experiments with color, and recycled materials.
2. Literacy in the Arts
The class will share their predictions and observations for how materials may interact. Students will use elements of graphic design to convey ideas.
3. Making connections through visual arts
Students will learn ways in which their creativity may be applied in other fields such as science or medicine.
4. Community and cultural resources
Students will participate in a group exhibition.
5. Careers and Lifelong learning in visual arts
Students will learn about the field of graphic design.
NY STATE STANDARDS EMPLOYED
1. Creating, Performing and participating in the arts.
2. Knowing and Using Arts Resources and Materials.
3. Responding and Analyzing Works of Art.
The author of this lesson, Kellie Rilla, a Masters in Art Education student of the School of Visual Arts in NYC, is the 2004-2005 scholarship recipient of the Keith Haring Scholarship award. This project is a collaboration with The School of Visual Arts & a local NYC public elementary school.
To find out more about The Keith Haring Foundation Scholarship offered through the School of Visual Arts, please contact: Director, School of Visual Arts/Visual Arts Foundation, 15 Gramercy Park South, NYC 10003 or SVA's web site.