Categories
- Curriculum: Art | Holiday Favorites | Dance & Music
- Age/Grade: Elementary 2 | Elementary 3
- Subject: Collage | Analysis and Theory | Sculpture | Exhibition
- Materials: Mixed Media
- Institution: Friends Select School
- Location: Philadelphia, Pennsylvania
- Duration: 1 - 2 Classes
Description
A fun and informative introduction to the art of Keith Haring and an opportunity for students to design and build their own paper figure sculptures!
Objective
Students will be introduced to the art of Keith Haring while watching a video interview with the artist and visiting the haringkids.com website.
Students and teacher will review and discuss Keith Haring's views of the function and placement of public art, and the importance of line and gesture in his figure drawings, paintings and sculptures.
Students will demonstrate their understanding of line and gesture as they design and create their own paper figure sculptures.
Students will explain how gesture influences the design of their sculptures during a class "gallery walk"
Resources
Drawing the Line: A Portrait of Keith Haring video
341A | Drawing the Line video | $20.00
-Call Pop Shop, 212.219.2784-
Materials
9" x 9" (22.9cm x 22.9cm) pre-cut index stock
8" x 8" (20.3cm x 20.3cm) primary colored paper
Black paper strips, variety of .5" (1.3cm), .75" (1.9cm), and 1" (2.5cm) strips
Scissors
Markers
Paper clips
Glue, and a low, flat container for pouring it into (I find that plastic sandwich containers with lids work great for storing the glue, and using it in this same container during the project = no more messy glue spills!)
Procedure
STEP 1
A visit to the haringkids.com website is an engaging and fun way to start this lesson.
I'm lucky enough to have a projector plugged into my computer, so as we gather on the rug of our art room studio, the class checks out the site to learn about the artist and see his artworks on display around the world. Next, I show the portion of the Drawing the Line video where we see Keith talking about his public sculptures, his thoughts of the role of sculptures, how and where they are exhibited. This introduction and review takes between 10-15 minutes.
While still on the rug, I ask the students if anyone knows what gesture means (a movement of the body or limbs that expresses or emphasizes an idea or a feeling.) Review how Keith Haring uses gesture in his art with a look at some of his artworks (on display in the room). Next, I demonstrate gesture by picking an idea or feeling, strike a pose, and have the students guess what it is
charades! I'll also have about three student volunteers try this (they'll all want to do it!) before we go to our work tables.
STEP 2
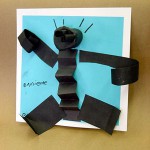
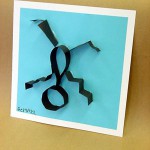
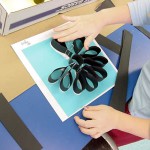
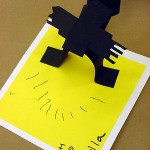
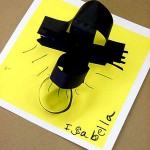
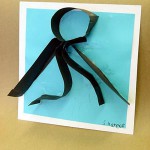
At our work tables I first choose a primary color paper square, center and glue it to the index-stock square. I use a marker to write my name on my art. Then, I demonstrate folding, twisting and bending techniques used in creating black paper strip forms (circles, zig-zags, spirals, curves, squares, etc.). Next, gesture figure composition combinations and choices are made on the tag board squares. Finally, the black paper strips are dragged on their edges through the glue and held in place onto the colored paper square; holding the pieces with the palm down and spreading evenly over the length of the top edge works best. I also point out that students can choose the option of designing their gesture figures to pop off the square in 3D fashion! Markers can be used to draw action or feeling lines around the paper sculpture figures. Paper clips can be used to hold just-glued strips together, if needed.
STEP 3
Be sure tabletop protectors (any large pieces of scrap paper) get on the tables.
STEP 4
Following demo, distribute supplies. Teacher or other student helpers distribute plastic cup/container lids with glue.
STEP 5
Students first glue primary colored paper squares of their choosing on the index-stock squares, write their names on their squares, then form gesture figures with black paper strips, placing on their colored paper squares, composing their design first, then gluing into place. Students can use markers to draw action or feeling lines around their paper sculpture figures.
STEP 6
When finished, students carry their artwork to drying area, clean up their space (checking under their table area for scraps; if usable, can be recycled), and then wash their hands.
STEP 7
Assemble the sculptures and displays into a class exhibit and have students share their work, discussing how they use gesture in their figures, just as Keith Haring did. Have students try to guess what each others gestures are! If video equipment is available, record the students during this "gallery walk!"
Questions
What does gesture mean?
How does Keith Haring use gesture in his art? What do his figures do?
How can you communicate feelings or actions in your art?
What did you learn about Keith Haring? Who does he make sculptures for?
Extensions
Early finishers can create companion sculptures; if there is more time left, you can always play another round of charades!