Categories
- Curriculum: Art | Language Arts
- Age/Grade: Early Childhood | Elementary 1 | Elementary 2
- Subject: Drawing | Sculpture | Exhibition
- Materials: Mixed Media | Markers
- Institution: Friends Select School
- Location: Philadelphia, Pennsylvania
- Duration: 2 - 3 Classes
Description
A fun and informative introduction to the art of Keith Haring and an opportunity for students to sculpt their own clay letters!
Objective
Students will be introduced to the art of Keith Haring while watching a video interview with the artist and visiting the haringkids.com website.
Students and teacher will review and discuss Keith Haring's views of the function and placement of public art.
Students will describe the type of exhibit space where they would place a sculpture.
Students will design and create their sculpture display space.
Students will create their own alphabet letter sculpture.
Students will explain their choices of display space for their sculptures during a class "gallery walk".
Resources
Drawing the Line: A Portrait of Keith Haring video
341A | Drawing the Line video | $20.00
-Call Pop Shop, 212.219.2784-
Materials
8" x 8" pre-cut and folded index stock (older kids can cut and fold their own)
Scissors
Masking tape
Choice of multi-colored markers, pencils, crayons, watercolors
Non-drying/non-hardening modeling clay
Procedure
CLASS 1
A visit to the haringkids.com website is an engaging and fun way to start this lesson. I'm lucky enough to have a projector plugged into my computer, so as we gather on the rug of our art room studio, the class checks out the site to learn about the artist and see his artworks on display around the world. Next, I show the portion of the Drawing the Line video where we see Keith talking about his public sculptures, and his thoughts of the role of sculptures, how and where they are exhibited. This introduction and review takes between 10-15 minutes.
We walk from the rug to our work tables, where we discuss what kind of place we'd like our sculptures to occupy: a park, a meadow, a stage, in the middle of the hallway outside our art room studio? We take a moment, close our eyes and imagine the scene. Next, as the students open their eyes, I show them my pre-made teacher sample: "Here's how I imagined where my sculpture would go!" I show the students step-by-step how the "environment" is created.
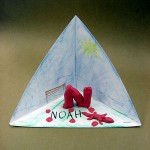
Take the pre-cut 8" x 8" square of index stock and fold it corner to corner to create a triangle. Unfold it, and fold in the opposite direction, creating another triangle. Unfold this, and show the students the folded "X" in the middle (for younger students, I've already done the folding, as this can be difficult for smaller hands, accurately folding the heavier card stock.) Distribute these pre-folded squares to each student. Next, I demonstrate how to cut from one corner of the square up to the center of the "X". Again, this may be difficult for some that are still developing their small motor skills. Students who are finished deposit their scissors back in the table supply bins, and can offer to help students who need assistance cutting.
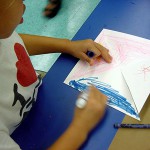
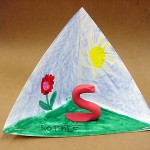
Next, I show the students how the "environment" is assembled. I fold the square into itself, forming a 3-D display space, with two "walls" and a "floor". Then I unfold it, and make a few masking tape donuts, applying them to one of the triangles, and fold the square back into the display space. Voila! Then I ask the students "Which is easier: to color this display all folded up and taped or to color it first, then fold and tape it together?" When they figure out which is easier, I un-tape the display and demonstrate how to color the "walls" and "floor" of the display; one of the "floor" triangles (adjacent to the cut) can be blank, of course, as it will be folded under the floor. Following this demonstration, coloring/painting materials (whichever you feel best work for your class) are distributed and students create their display spaces only after they first write their names on the square (where they choose-except, of course, on the triangle which will be folded under). Those who are not finished by clean-up time may finish this part of the project in the next class. Early finishers may assemble and tape their displays.
CLASS 2
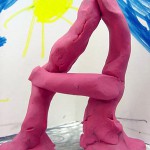
Review the previous class lesson with a look at some of Keith Haring's art on the haringkids.com website. Point out to the students how "alive" the static figures seem and introduce the idea of incorporating gesture into the students' sculptures. Display a pre-made teacher sample sculpture. The theme of this project is turning the first letter of your first name into a clay sculpture!
Demonstrate clay-modeling techniques, such as molding and joining separate pieces of clay. Have funthe students will be inspired to explore the possibilities watching you play with the clay! Distribute the clay and assist as needed. Once their sculptures are complete, students may place their sculptures in their displays. Have coloring supplies on hand for students who did not finish their displays during the previous class. Have early finishers assist in cleanup. Assemble the sculptures and displays into a class exhibit and have students share their work, discussing how their art fits their environments, just like Keith Haring did in the video. If video equipment is available, record the students during this "gallery walk!"
Questions
Where do you see sculptures? What do you do when you see a sculpture? Do you just look at it? Should you touch it?
Can you play on or around it? Can you sit underneath or on top of it?
What did you learn about Keith Haring? Who does he make sculptures for?
Extensions
Early finishers can add to their display by creating companion sculptures!